Marcel van Es Geplaatst 9 december, 2007 Rapporteer Share Geplaatst 9 december, 2007 Hoi Vanmiddag de schuur opgeruimd, want ik wilde de velgen gaan schuren, die velgen zien er zo verschrikkelijk uit dat ze even geschuurd moeten worden. Zo even met de kleine schuur machine en een heel fijn schuurpapiertje, verder geschuurd. En ze moeten nog gepolijst worden. Hoe kan ik de velgen gaan polijsten Ben al een tijdje bezig met schuren maar nu moeten ze nog gepolijst worden, zo alle 4 de velgen zijn nu alle weer glad en ik moet zeggen het is weer netjes geworden. Alleen de glimmende rand die wil ik er weer op hebben wie weet hoe ik dat kan doen. Alvast Link naar reactie Delen op andere sites More sharing options...
0 dexter Geplaatst 10 december, 2007 Rapporteer Share Geplaatst 10 december, 2007 denk dat het moet lukken met een speciale polijst schijf en polijstpasta. dan moet het lukken om hem weer glimmend te krijgen. Link naar reactie Delen op andere sites More sharing options...
0 BART3SGTE Geplaatst 10 december, 2007 Rapporteer Share Geplaatst 10 december, 2007 Een vriend van mij heeft een Toyoya MR2 Turbo http://www.superwhite2.com. Hij heeft veel aandacht besteed aan de afwerking van deze auto en heeft o.a. veel gepolijst. Hij heeft het polijstproces geheel gedocumenteerd. Zie hieronder de volledige uitleg. We start with the standard piece, in this case it's the coolant neck of a Gen3 3S-GTE engine. The first step is the most time consuming and important phase. The amount of work and detail you're prepared to bring into this phase determines how well it'll look in the end. To get the part to a smooth, mirror-shine finish we need to smoothen the surface of the part. Since this aluminum part is cast, the cast structure needs to be leveled. Aluminum is very soft and this can be achieved by hand-sanding the structure down with grit 80 sanding paper: I'm using a cork sanding block, which isn't too large and gives in a little. A hard, plastic sanding block wouldn't work as well because it's not flexible, making it much harder to sand curved surfaces. After the first stroke, this problem area becomes visible: The top is not completely round but has a weird shape. You could leave it like this, but as I said, this stage determines how well the finished piece will look. So I want this removed to create a nice round shape instead of what it is now. I use a big metal file to level the high areas. This is the result: I also filed down the casting seams at the top: The rest of the shapes were okay, these just required sanding. Do as much as you can with the sanding block, because you can easily apply pressure on it, making the work much easier. Also, when not using a tool like a block, you're bound to create waves in the soft material, which will show once it's completed. Compare it to body filler: you need the sanding block to create a tight, planar surface. If you'd sand the filler by hand, you'd create a warped surface. After sanding more: Here I filed away the ongoing casting seam with the same file: The file leaves pretty heavy scratches. 80 Grit sandpaper deals with it though: A bit further down, there's a small '2' cast into the piece. I used a miniature file to get rid of it: I used the large metal file again to level this: You can see how much material was removed by looking at the blank material. After more sanding, sanding and sanding, stage1 was completed. TIME NEEDED TO COMPLETE 80GRIT SANDING: 6-7 HOURS The next stages are considerably shorter, and easier. 120 Grit sandpaper is up! In this picture, the top part has been sanded down with 120 grit, the rest is still 80. The idea is, that every scratch you made with the 80 grit sanding paper must be removed by the 120 grit. If you don't, you'll see it throughout the remaining stages! Here, the piece is complete done. TIME NEEDED TO COMPLETE 120GRIT SANDING: 1.5 HOURS. The next stage is 220 grit sanding. Again, you should sand away all the sanding marks left by the 120 grit stage. All done: TIME NEEDED TO COMPLETE 220GRIT SANDING: 1 HOUR. The next phase it 400. This is where it gets tricky, because this is one of the highest grits you can still dry-sand. Wipe off the paper often, because it tends to fill up with aluminum dust very quickly. As you can see, the piece gets shinier by the hour! TIME NEEDED TO COMPLETE 400GRIT SANDING: 1 HOUR. Now we move to wet sanding. Get a bucket of warm water and throw in some pieces of 1200 grit sanding paper. You might also get an old towel, fold it four times, and lay it on your lap. I found this greatly helps in not getting my lap soaking wet. Also, note that at this point, sanding can be done by hand for most parts. You're not altering the shape of the piece any more, you're just refining the texture of the aluminum. Some parts may still be easier to do with a block or rubber, but hand-sanding will get you into all the tight areas. TIME NEEDED TO COMPLETE 1200GRIT WET-SANDING: 45 MINUTES. The last sanding step is 2500 grit. Again, this can be done by hand to save time. Finished piece: TIME NEEDED TO COMPLETE 2500GRIT WET-SANDING: 45 MINUTES. Now it's time for the topping on the ice! Get yourself a hard cotton/cloth polishing disc with polishing paste (usually a hard bar), and mount it on a drill. Use this to polish the piece to the mirror-shine you always dreamed of! TIME NEEDED TO COMPLETE MACHINE POLISHING: 15 MINUTES. Now get polishing people!! Link naar reactie Delen op andere sites More sharing options...
0 bm-er Geplaatst 10 december, 2007 Rapporteer Share Geplaatst 10 december, 2007 Na het polijsten zou ik het wel in de blanke lak zetten, anders gaat het lichtmetaal vrolijk door met corroderen. Link naar reactie Delen op andere sites More sharing options...
0 BART3SGTE Geplaatst 10 december, 2007 Rapporteer Share Geplaatst 10 december, 2007 Of gewoon vaak poetsen Link naar reactie Delen op andere sites More sharing options...
0 Vdub Geplaatst 10 december, 2007 Rapporteer Share Geplaatst 10 december, 2007 wow glimmie glimmie. Link naar reactie Delen op andere sites More sharing options...
0 rick Geplaatst 10 december, 2007 Rapporteer Share Geplaatst 10 december, 2007 Da's nog eens wat voor de donkere winteravond.... pfff wat een klus zeg. Link naar reactie Delen op andere sites More sharing options...
0 appi Geplaatst 10 december, 2007 Rapporteer Share Geplaatst 10 december, 2007 Da's nog eens wat voor de donkere winteravond.... pfff wat een klus zeg. daar krijg je pijn aan de handjes van :flits: Link naar reactie Delen op andere sites More sharing options...
0 antonio Geplaatst 10 december, 2007 Rapporteer Share Geplaatst 10 december, 2007 Mooi gedaan. Link naar reactie Delen op andere sites More sharing options...
0 dexter Geplaatst 10 december, 2007 Rapporteer Share Geplaatst 10 december, 2007 Wat een werk zeg maar ziet er wel mooi uit Link naar reactie Delen op andere sites More sharing options...
0 harly Geplaatst 10 december, 2007 Rapporteer Share Geplaatst 10 december, 2007 Heb dat ooit eens zo gedaan met de carburateur van mijn kever en idd als je er dan verder niks mee doet dan issie naar een jaartje weer mat grijs. Link naar reactie Delen op andere sites More sharing options...
0 Marcel van Es Geplaatst 10 december, 2007 Auteur Rapporteer Share Geplaatst 10 december, 2007 Nou ik vindt het in 1 woord, er verschrikkelijk mooi uit zien. Als mijn velgen er voor de helf zo mooi uit zien ben ik al tevreden. En nu moet ik het nog even met 400 grint paper dan een poosje met 1200 grint paper en dan nog even met 2500 en als dat gedaan is met een katoenen schijf in je boormachine, ik denk dat het in mijn geval beter is omdat het een velgenrand is, dat een katoenen schijf in voor een haakse slijper beter zal zijn? Oh het is dat ik het niet hebt liggen anders was ik al bezig geweest super vind ik het Link naar reactie Delen op andere sites More sharing options...
0 BART3SGTE Geplaatst 11 december, 2007 Rapporteer Share Geplaatst 11 december, 2007 Gepolijst aluminium is ook zeker erg mooi. Het is alleen een zeer tijdrovende klus, maar als je het eindresultaat ziet dan ben je je zere vingers snel vergeten Ik heb zelf ook e.e.a. in het verleden gepolijst. Je moet toch iets doen op zondag. Zo gekocht: Met dit als eindresultaat: Link naar reactie Delen op andere sites More sharing options...
0 Alain Geplaatst 15 december, 2007 Rapporteer Share Geplaatst 15 december, 2007 Nou ik vindt het in 1 woord, er verschrikkelijk mooi uit zien. Als mijn velgen er voor de helf zo mooi uit zien ben ik al tevreden. En nu moet ik het nog even met 400 grint paper dan een poosje met 1200 grint paper en dan nog even met 2500 en als dat gedaan is met een katoenen schijf in je boormachine, ik denk dat het in mijn geval beter is omdat het een velgenrand is, dat een katoenen schijf in voor een haakse slijper beter zal zijn? Oh het is dat ik het niet hebt liggen anders was ik al bezig geweest super vind ik het Hoi marcel Hoe staat het met je velgjes, zijn ze al gepolijst.. greets Alain.. Link naar reactie Delen op andere sites More sharing options...
0 Marcel van Es Geplaatst 16 december, 2007 Auteur Rapporteer Share Geplaatst 16 december, 2007 HoiVanmiddag de schuur opgeruimd, want ik wilde de velgen gaan schuren, die velgen zien er zo verschrikkelijk uit dat ze even geschuurd moeten worden. Zo even met de kleine schuur machine en een heel fijn schuurpapiertje, verder geschuurd. En ze moeten nog gepolijst worden. Hoe kan ik de velgen gaan polijsten Ben al een tijdje bezig met schuren maar nu moeten ze nog gepolijst worden, zo alle 4 de velgen zijn nu alle weer glad en ik moet zeggen het is weer netjes geworden. Alleen de glimmende rand die wil ik er weer op hebben wie weet hoe ik dat kan doen. Alvast Hoi een update Zaterdag Maar eens op pad geweest, ik moest scuurpapier hebben 2000 en polijstmidden voor aluminium. Ik gaat naar een auto onderdelen zaak en daar tref ik schuur papier die ik moest hebben, korel 2000, en ook een flesje met polijst middel speciaal voor aluminium velgen precies wat ik nodig had Zo waren de velgen Zo eerst maar eens met warm water en nog even met korel 1000 en nog even met korel 2000 en dan polijsten. Ik heb toch wel zorgen, omdat de velgen zo verschrikkelijk beschadigd waren, dat ik dacht komt dat nog wel goed? Ik heb heel hard moeten drukken met schuren dat ik toch wel vlekken zag in de velgrand Ben heel druk met plijsten bezig geweest met dit resultaat Zo zien ze er uit als je ze hebt gepolijst nu nog uit poetsen Zo hier de laatste velg, nu nog een beetje bij schuren met korel 2000 en dan polijsten, En dan is dit het resultaat. Ik weet, op de foto is het natuurlijk toch wel moeilijk om een oordeel te geven, maar ik kan je verzekeren dat je verstelt zult staan als je ze in het echt zal zien. Ik zat ook met stomheid tekijken. Link naar reactie Delen op andere sites More sharing options...
0 diesel986 Geplaatst 16 december, 2007 Rapporteer Share Geplaatst 16 december, 2007 Ziet er goed uit Marcel, zelf was je denk ik minder schoon na het polijsten Link naar reactie Delen op andere sites More sharing options...
0 SilverBullet Geplaatst 16 december, 2007 Rapporteer Share Geplaatst 16 december, 2007 Goed gedaan man! Link naar reactie Delen op andere sites More sharing options...
0 3V Geplaatst 16 december, 2007 Rapporteer Share Geplaatst 16 december, 2007 Mooi hoor, klasse! Weet je al hoe je ze gaat sealen? Want dat lijkt mij nog het grootste probleem. Of laat je dat doen? Link naar reactie Delen op andere sites More sharing options...
0 Marcel van Es Geplaatst 16 december, 2007 Auteur Rapporteer Share Geplaatst 16 december, 2007 Ziet er goed uit Marcel, zelf was je denk ik minder schoon na het polijsten Hoi Eric. Helemaal zwart zelfs mijn schoenen zijn zwart geworden maar de velgen zijn weer Link naar reactie Delen op andere sites More sharing options...
0 Marcel van Es Geplaatst 16 december, 2007 Auteur Rapporteer Share Geplaatst 16 december, 2007 Mooi hoor, klasse! Weet je al hoe je ze gaat sealen? Want dat lijkt mij nog het grootste probleem. Of laat je dat doen? Hoi Arjan Hoe bedoel je sealen? Link naar reactie Delen op andere sites More sharing options...
0 volvwil Geplaatst 16 december, 2007 Rapporteer Share Geplaatst 16 december, 2007 das mooi geworden zeg! enne mooie wielen trouwens ... Link naar reactie Delen op andere sites More sharing options...
0 3V Geplaatst 16 december, 2007 Rapporteer Share Geplaatst 16 december, 2007 Mooi hoor, klasse! Weet je al hoe je ze gaat sealen? Want dat lijkt mij nog het grootste probleem. Of laat je dat doen? Hoi Arjan Hoe bedoel je sealen? Ga je ze (laten) spuiten met blanke lak of breng je ze naar de velgendokter of zo voor een coating? Want anders zijn ze binnen no-time weer lelijk. Je hebt er nu zoveel werk in zitten, dan is het goed om er een goede beschermende laag overheen te hebben. Bij originele velgen is dat een soort coating die erin gebakken wordt, dat kun je zelf niet. En ik weet niet hoelang het goedblijft als je er zelf blanke lak overheen spuit. Link naar reactie Delen op andere sites More sharing options...
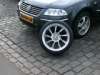
0 Staffie Geplaatst 17 december, 2007 Rapporteer Share Geplaatst 17 december, 2007 Klasse , wat een klus...... Weet je ook mensen wie velgen tegen betaling polijsten ? Ik heb nog een setje 18'' wie gedaan 'mogen' worden PS: @Marcel: Ik vind de linkerkant van je auto mooier dan de rechterkant Link naar reactie Delen op andere sites More sharing options...
0 Groovejunk Geplaatst 17 december, 2007 Rapporteer Share Geplaatst 17 december, 2007 Goed bezig Marcel! Je was zelf met stomheid geslagen van het resultaat? Link naar reactie Delen op andere sites More sharing options...
0 comfortcruiser Geplaatst 17 december, 2007 Rapporteer Share Geplaatst 17 december, 2007 Looking Good!!! Link naar reactie Delen op andere sites More sharing options...
0 passatvw Geplaatst 17 december, 2007 Rapporteer Share Geplaatst 17 december, 2007 Echt toppie Marcel! Link naar reactie Delen op andere sites More sharing options...

Vraag
Marcel van Es
Hoi
Vanmiddag de schuur opgeruimd, want ik wilde de velgen gaan schuren, die velgen zien er zo verschrikkelijk uit dat ze even geschuurd moeten worden.
Zo even met de kleine schuur machine en een heel fijn schuurpapiertje,
verder geschuurd.
En ze moeten nog gepolijst worden.
Hoe kan ik de velgen gaan polijsten
Ben al een tijdje bezig met schuren maar nu moeten ze nog gepolijst
worden, zo alle 4 de velgen zijn nu alle weer glad en ik moet zeggen het is weer netjes geworden.
Alleen de glimmende rand die wil ik er weer op hebben wie weet hoe ik dat kan doen.
Alvast
Link naar reactie
Delen op andere sites
Top Posters For This Question
18
4
3
3
Popular Days
17 dec
26
10 dec
11
30 apr
8
16 dec
7
Top Posters For This Question
Marcel van Es 18 posts
BART3SGTE 4 posts
Alain 3 posts
3V 3 posts
Popular Days
17 dec 2007
26 posts
10 dec 2007
11 posts
30 apr 2008
8 posts
16 dec 2007
7 posts
Posted Images
57 antwoorden op deze vraag
Aanbevolen berichten